MX5 mk4 Manual
Home bodyshop manual wiring diagram workshop manual service highlights transmission overhaul

Knowledge Base

Free to use workshop manual for your 2015+ Mk4 'ND' Mazda MX-5
Home


< Previous   Next >

DTC P0133:00 [PCM (SKYACTIV-G 2.0)]

NOTE:

  • To determine the malfunctioning part, proceed with the diagnostics from "Function Inspection Using M-MDS".

Details On DTCs

DESCRIPTION

A/F sensor circuit slow response

DETECTION CONDITION

Determination conditions

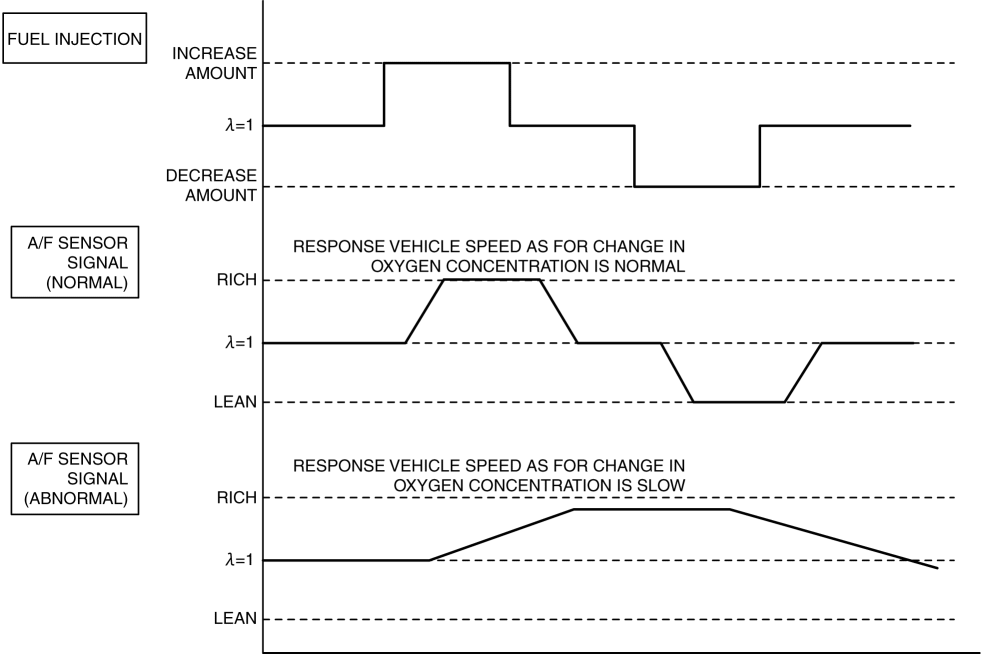
  • The response speed of the A/F sensor input signal when the air/fuel ratio is fluctuated is slow.

Preconditions

  • Engine speed: Within specified range

  • Charging efficiency: Within specified range

  • Engine coolant temperature: Specified value or more

  • Mass airflow: Within specified range

  • The following DTCs are not detected:

    • A/F sensor heater: P0031:00, P0032:00

    • ECT sensor No.1: P0117:00, P0118:00

    • VSS signal: P0500:00

    • Misfire: P0300:00, P0301:00, P0302:00, P0303:00, P0304:00

    • Fuel injection correction: P0171:00, P0172:00, P2096:00, P2097:00

Drive cycle

  • 2

Self test type

  • CMDTC self test

Sensor used

  • A/F sensor

FAIL-SAFE FUNCTION

  • Fixes duty value of A/F sensor heater

  • Stops fuel feedback control of A/F sensor

VEHICLE STATUS WHEN DTCs ARE OUTPUT

  • Illuminates check engine light.

POSSIBLE CAUSE

  • A/F sensor signal malfunction

    • A/F sensor connector or terminals malfunction

    • A/F sensor loose

    • Exhaust system leakage

  • A/F sensor deterioration

  • A/F sensor heater malfunction

  • PCM malfunction

System Wiring Diagram

  • Not applicable

Function Explanation (DTC Detection Outline)

  • The PCM detects the oxygen concentration in the exhaust gas based on the A/F sensor signal. By intentionally increasing/decreasing the fuel injection amount, the PCM controls the oxygen concentration in the exhaust gas to rich or lean and monitors the response speed of the A/F sensor to sudden changes in the oxygen concentration. If the response speed of the signal input from the A/F sensor is slow while switching repeatedly between rich and lean, the PCM determines an A/F sensor malfunction and stores a DTC.

Repeatability Verification Procedure

  • Warm up the engine to allow the engine coolant temperature to reach 80 °C {176 °F} or more.

  • Start the engine and leave it idling for 1 min.

  • Shift to 3rd gear and drive the vehicle for 10 min at an engine speed of 1,500 rpm or more and a vehicle speed of 50 km/h {31 mph} or more.

    NOTE:

    • Match the engine coolant temperature in the recorded FREEZE FRAME DATA/snapshot data, the vehicle speed, and engine speed values to the best extent possible while driving the vehicle.

  • Try to reproduce the malfunction by driving the vehicle for 5 min based on the values in the FREEZE FRAME DATA/snapshot data.

PID Item/Simulation Item Used In Diagnosis

PID/DATA monitor item table

Item

Definition

Unit

Condition/Specification

HTR11

A/F sensor heater operation status

Off/On

  • Ignition switched ON (engine off): Off

  • Idle (after warm up): On

A/F sensor heater control duty value

%

  • Ignition switched ON (engine off): 0%

  • Idle (after warm up): 71.37% (ECT is 91 °C {196 °F})

O2S11

A/F sensor current

µA

  • Idle (after warm up): ???59 µA (ECT is 92 °C {198 °F})

  • Deceleration fuel cut (accelerator pedal released from engine speed of 4,000 rpm or more): Approx. 3.48 mA (ECT is 92 °C {198 °F})

Function Inspection Using M-MDS

STEP

INSPECTION

RESULTS

ACTION

1

PURPOSE: VERIFY RELATED REPAIR INFORMATION AVAILABILITY
  • Verify related Service Bulletins and/or on-line repair information availability.

  • Is any related repair information available?

Yes

Perform repair or diagnosis according to the available repair information.

  • If the vehicle is not repaired, go to the next step.

No

Go to the next step.

2

PURPOSE: IDENTIFY TRIGGER DTC FOR FREEZE FRAME DATA
  • Is the DTC P0133:00 on FREEZE FRAME DATA?

Yes

Go to the next step.

No

Go to the troubleshooting procedure for DTC on FREEZE FRAME DATA.

(See DTC TABLE [PCM (SKYACTIV-G 2.0)].)

3

PURPOSE: RECORD FREEZE FRAME DATA/SNAPSHOT DATA AND DIAGNOSTIC MONITORING TEST RESULTS TO UTILIZE WITH REPEATABILITY VERIFICATION

NOTE:

  • Recording can be facilitated using the screen capture function of the PC.

  • Record the FREEZE FRAME DATA/snapshot data and DIAGNOSTIC MONITORING TEST RESULTS (A/F sensor, HO2S related) on the repair order.

???

Go to the next step.

4

PURPOSE: VERIFY IF DIAGNOSTIC RESULT IS AFFECTED BY DTC OCCURRING FROM A/F SENSOR UNIT
  • Switch the ignition off, then ON (engine off).

  • Perform the Pending Trouble Code Access Procedure and DTC Reading Procedure.

    (See ON-BOARD DIAGNOSTIC TEST [PCM (SKYACTIV-G 2.0)].)

  • Is the PENDING CODE/DTC P0131:00, P0132:00, P0134:00, P2237:00, P2243:00 or P2251:00 also present?

Yes

Go to the applicable DTC inspection.

(See DTC P0131:00 [PCM (SKYACTIV-G 2.0)].)

(See DTC P0132:00 [PCM (SKYACTIV-G 2.0)].)

(See DTC P0134:00 [PCM (SKYACTIV-G 2.0)].)

(See DTC P2237:00 [PCM (SKYACTIV-G 2.0)].)

(See DTC P2243:00 [PCM (SKYACTIV-G 2.0)].)

(See DTC P2251:00 [PCM (SKYACTIV-G 2.0)].)

Go to the next step.

No

Go to the next step.

5

PURPOSE: VERIFY A/F SENSOR
  • Start the engine and idle it.

  • Access the O2S11 PID using the M-MDS.

    (See ON-BOARD DIAGNOSTIC TEST [PCM (SKYACTIV-G 2.0)].)

  • Is the O2S11 PID value normal?

    (See PCM INSPECTION [SKYACTIV-G 2.0].)

Yes

Go to the next step.

No

Go to the troubleshooting procedure to perform the procedure from Step 1.

6

PURPOSE: VERIFY A/F SENSOR HEATER
  • Start the engine and idle it.

  • Access the HTR11 PID using the M-MDS.

    (See ON-BOARD DIAGNOSTIC TEST [PCM (SKYACTIV-G 2.0)].)

  • Is the HTR11 PID value normal?

    (See PCM INSPECTION [SKYACTIV-G 2.0].)

Yes

Go to the next step.

No

Go to the troubleshooting procedure to perform the procedure from Step 5.

7

PURPOSE: VERIFY DTC
  • Switch the ignition off, then ON (engine off).

  • Retrieve the PCM DTCs using the M-MDS.

    (See ON-BOARD DIAGNOSTIC TEST [PCM (SKYACTIV-G 2.0)].)

  • Are any DTCs present?

Yes

Go to the applicable DTC inspection.

(See DTC TABLE [PCM (SKYACTIV-G 2.0)].)

Go to the troubleshooting procedure to perform the procedure from Step 1.

No

Go to the troubleshooting procedure to perform the procedure from Step 1.

Troubleshooting Diagnostic Procedure

    Intention of troubleshooting procedure
  • Step 1???5

    • Perform inspection of A/F sensor signal related parts.

  • Step 6

    • Verify that the primary malfunction is resolved and there are no other malfunctions.

STEP

INSPECTION

RESULTS

ACTION

1

PURPOSE: INSPECT A/F SENSOR CONNECTOR CONDITION
  • Switch the ignition off.

  • Disconnect the A/F sensor connector.

  • Inspect for poor connection (such as damaged/pulled-out pins, corrosion).

  • Is there any malfunction?

Yes

Repair or replace the connector and/or terminals, then go to Step 6.

No

Go to the next step.

2

PURPOSE: INSPECT INSTALLATION OF A/F SENSOR
  • Inspect installation of A/F sensor.

  • Is the A/F sensor installed securely?

Yes

Go to the next step.

No

Retighten the A/F sensor, then go to Step 6.

(See AIR FUEL RATIO (A/F) SENSOR REMOVAL/INSTALLATION [SKYACTIV-G 2.0].)

3

PURPOSE: VERIFY IF MALFUNCTION RELATED TO EMISSION SYSTEM AFFECTS A/F SENSOR SIGNAL
  • Inspect for exhaust gas leakage from the exhaust system. (between A/F sensor and HO2S)

  • Is there any malfunction?

Yes

Repair or replace the malfunctioning part according to the inspection results, then go to Step 6.

No

Go to the next step.

4

PURPOSE: DETERMINE INTEGRITY OF A/F SENSOR
  • Reconnect all disconnected connectors.

  • Inspect the A/F sensor.

    (See AIR FUEL RATIO (A/F) SENSOR INSPECTION [SKYACTIV-G 2.0].)

  • Is there any malfunction?

Yes

Replace the A/F sensor, then go to Step 6.

(See AIR FUEL RATIO (A/F) SENSOR REMOVAL/INSTALLATION [SKYACTIV-G 2.0].)

No

Go to the next step.

5

PURPOSE: DETERMINE INTEGRITY OF A/F SENSOR HEATER
  • Inspect the A/F sensor heater.

    (See AIR FUEL RATIO (A/F) SENSOR INSPECTION [SKYACTIV-G 2.0].)

  • Is there any malfunction?

Yes

Replace the A/F sensor, then go to the next step.

(See AIR FUEL RATIO (A/F) SENSOR REMOVAL/INSTALLATION [SKYACTIV-G 2.0].)

No

Go to the next step.

6

PURPOSE: VERIFICATION OF VEHICLE REPAIR COMPLETION
  • Always reconnect all disconnected connectors.

  • Clear the DTC from the PCM memory using the M-MDS.

    (See CLEARING DTC [PCM (SKYACTIV-G 2.0)].)

  • Implement the repeatability verification procedure.

    (See Repeatability Verification Procedure.)

  • Perform the Pending Trouble Code Access Procedure.

    (See ON-BOARD DIAGNOSTIC TEST [PCM (SKYACTIV-G 2.0)].)

  • Is the PENDING CODE for this DTC present?

Yes

Repeat the inspection from Step 1.

  • If the malfunction recurs, replace the PCM.

    (See PCM REMOVAL/INSTALLATION [SKYACTIV-G 2.0].)

Go to the next step.

No

DTC troubleshooting completed.

< Previous   Next >
 

Free to use workshop manual for your 2015+ Mk4 'ND' Mazda MX-5

COPYRIGHT NOTICE:
This fan site is not affiliated with Mazda, and is intended for personal, or commercial use only. The content of our web pages is for general information purposes only and is presented “as is”. We give no assurance or warranty regarding the accuracy of the contents. Readers should do their due diligence and seek the advice of an appropriately certified automotive technician before attempting any steps on this site. Original content provided by Mazda North America. The content of the manual is copyright under DMCA to: full.metal.resistor@gmail.com
LIMITATION OF LIABILITY:
We accept no responsibility for errors, inaccuracies, or omissions found on these pages. Additionally, we hereby exclude liability for any demands, claims, damages or losses of any kind with regard to any content or information provided on our web-site, including but not limited to incidental or consequential damages, direct or indirect loss, compensatory damages, loss of profits, or otherwise. By using this manual you assume full liablity for any procedures carried out on your vehicle, and are responsible for the vehicle remaining road legal and safe.
Site design © MX5 Docs 2019
Privacy policy
Cookies
X
We use cookies to improve your experience on
our site. By using our site you consent to cookies.
Learn more
I Agree