< Previous
Next >
REAR SHOCK ABSORBER AND COIL SPRING REMOVAL/INSTALLATION
CAUTION:
Performing the following procedures could cause an open circuit in the rear ABS wheel-speed sensor wiring harness if it is pulled by mistake. Before servicing, disconnect the rear ABS wheel-speed sensor and set it aside so that the wiring harness will not be pulled by mistake.
1. Disconnect the negative battery cable. (See NEGATIVE BATTERY CABLE DISCONNECTION/CONNECTION.)
2. Remove the trunk end trim. (See TRUNK END TRIM REMOVAL/INSTALLATION.)
3. When working on the left side of the vehicle, remove the trunk covering. (See TRUNK COVERING REMOVAL/INSTALLATION.)
4. When working on the left side of the vehicle, remove the partition board. (See PARTITION BOARD REMOVAL/INSTALLATION.)
5. Remove the trunk side trim. (See TRUNK SIDE TRIM REMOVAL/INSTALLATION.)
6. When working on the left side of the vehicle, remove the fuel-filler pipe protector. (See FUEL-FILLER PIPE REMOVAL/INSTALLATION [SKYACTIV-G 2.0].)
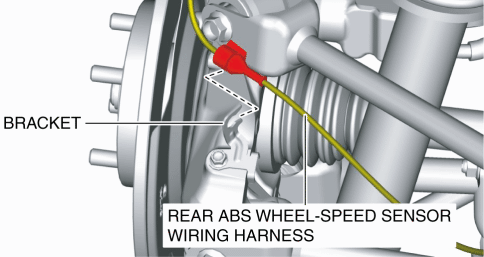
7. Remove the rear ABS wheel-speed sensor from the hub support.

8. Remove the rear ABS wheel-speed sensor wiring harness from the bracket and set it aside so that it does not interfere with the servicing.
9. When working on the left side of the vehicle, remove the auto leveling sensor and the auto leveling sensor short cord as a single unit. (See AUTO LEVELING SENSOR REMOVAL/INSTALLATION.) (See AUTO LEVELING SENSOR SHORT-CORD REMOVAL/INSTALLATION.)
10. Remove in the order indicated in the table.
11. Install in the reverse order of removal.
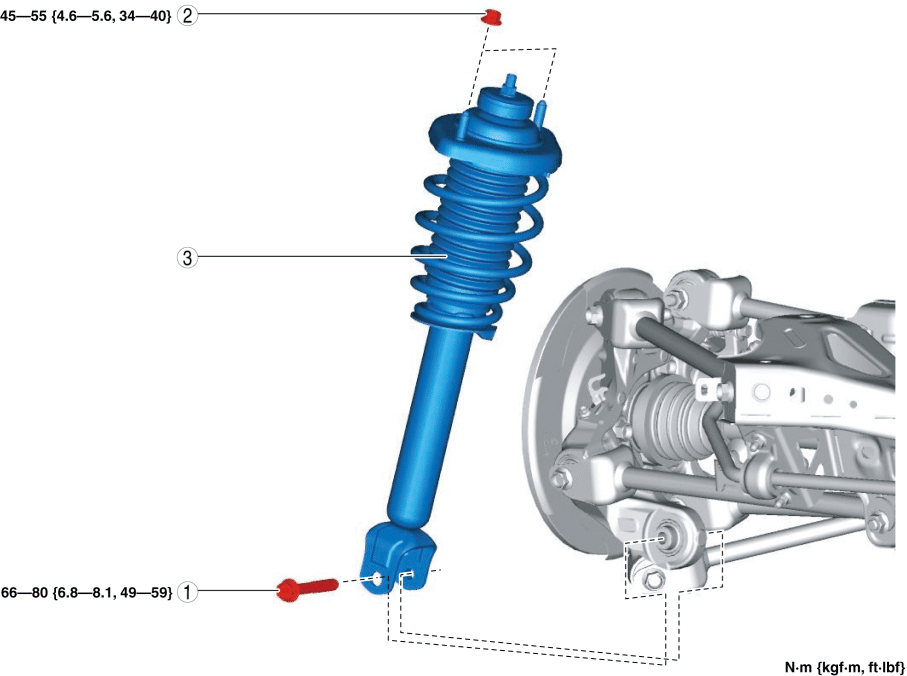
| 1 |
Rear shock absorber lower bolt |
| 2 |
Rear shock absorber upper nut |
| 3 |
Rear shock absorber and coil spring (See Rear Shock Absorber And Coil Spring Installation Note.) |
Rear Shock Absorber And Coil Spring Installation Note
1. Install the rear shock absorber so that the rear shock absorber lower bolt can be inserted from the rear of the vehicle.
Rear Shock Absorber Lower Bolt Installation Note
1. Insert the rear shock absorber lower bolt from the rear of the vehicle and tighten it to the specified torque.< Previous Next >Tightening torque
66—80 N·m {6.8—8.1 kgf·m, 49—59 ft·lbf}