SEAT BELT REMOVAL/INSTALLATION
WARNING:
Handling the seat belt (pre-tensioner seat belt or lap pre-tensioner seat belt) improperly can accidentally deploy the pre-tensioner, which may seriously injure you. Read the air bag system service warnings and cautions before handling the seat belt (pre-tensioner seat belt or lap pre-tensioner seat belt).
(See AIR BAG SYSTEM SERVICE WARNINGS [TWO-STEP DEPLOYMENT CONTROL SYSTEM].)
(See AIR BAG SYSTEM SERVICE CAUTIONS [TWO-STEP DEPLOYMENT CONTROL SYSTEM].)
(See AIR BAG SYSTEM SERVICE WARNINGS [STANDARD DEPLOYMENT CONTROL SYSTEM].)
(See AIR BAG SYSTEM SERVICE CAUTIONS [STANDARD DEPLOYMENT CONTROL SYSTEM].)
Handling the seat (with side air bag module) improperly can accidentally operate (deploy) the air bag, which may seriously injure you. Read the air bag system service warnings and cautions before handling the seat (with side air bag module).
(See AIR BAG SYSTEM SERVICE WARNINGS [TWO-STEP DEPLOYMENT CONTROL SYSTEM].)
(See AIR BAG SYSTEM SERVICE CAUTIONS [TWO-STEP DEPLOYMENT CONTROL SYSTEM].)
(See AIR BAG SYSTEM SERVICE WARNINGS [STANDARD DEPLOYMENT CONTROL SYSTEM].)
(See AIR BAG SYSTEM SERVICE CAUTIONS [STANDARD DEPLOYMENT CONTROL SYSTEM].)
The side air bag sensor is installed inside the tire house trim. Therefore, if excessive force is applied around the tire house trim, the side air bag may operate (deploy) accidently, which may cause serious injury. When working around the tire house trim, disconnect the negative battery cable or work carefully, avoiding excessive impact around the tire house trim.
CAUTION:
If the retractor is disassembled, the seat belt will not pull out or retract correctly due to looseness and excessive play. Therefore, do not disassemble the retractor.
Seat belt With Lap Pre-tensioner Seat Belt
1. Switch the ignition off.
2. Disconnect the negative battery cable and wait for 1 min or more. (See NEGATIVE BATTERY CABLE DISCONNECTION/CONNECTION.)
3. Pass the seat belt through the slit of the guide, move it in the order of arrows (1) and (2) shown in the figure, and remove it from the guide.

4. Remove the seat. (See SEAT REMOVAL/INSTALLATION.)
5. Remove the fastener.

6. Remove the lap pre-tensioner seat belt cover.
7. Remove the following parts:a. Scuff plate (See SCUFF PLATE REMOVAL/INSTALLATION.)b. Front seat back bar garnish (See SEAT BACK BAR GARNISH REMOVAL/INSTALLATION.)c. Quarter trim (See QUARTER TRIM REMOVAL/INSTALLATION.)d. Tire house trim (See TIRE HOUSE TRIM REMOVAL/INSTALLATION.)
8. Bend back the back trim. (See BACK TRIM REMOVAL/INSTALLATION.)
9. Using a flathead screwdriver, lift the lap pre-tensioner seat belt connector locking device carefully, however do not remove it.
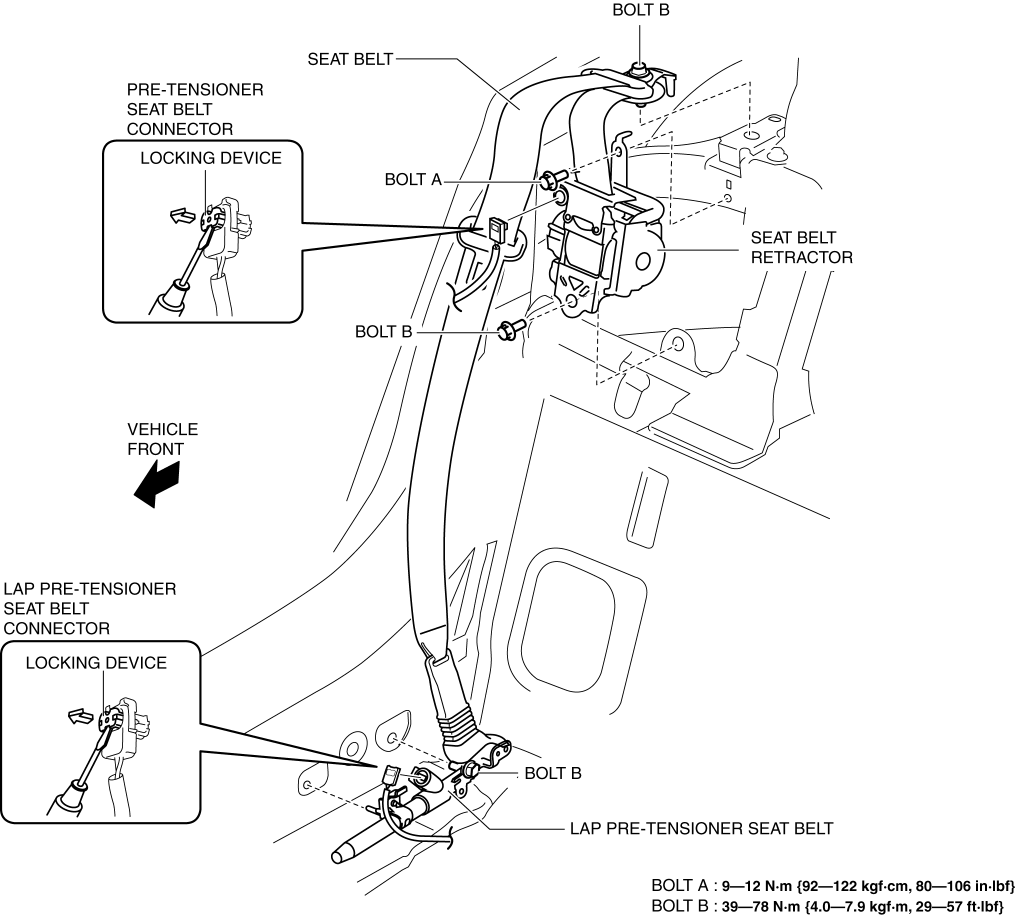
10. Disconnect the lap pre-tensioner seat belt connector.
11. Using a flathead screwdriver, lift the pre-tensioner seat belt connector locking device carefully, however do not remove it.
12. Disconnect the pre-tensioner seat belt connector.
13. Remove bolt A.
14. Remove bolt B.
15. Remove the lap pre-tensioner seat belt.
16. Remove the seat belt retractor.
17. Remove the seat belt.
18. Install in the reverse order of removal.
19. Switch the ignition ON (engine off or on).
20. Verify that the air bag/seat belt pre-tensioner system warning light illuminates for approx. 6 s and turns off.
If the air bag/seat belt pre-tensioner system warning light does not operate, refer to the on-board diagnostic system (air bag system) and perform inspection of the system. (See FLOWCHART [SAS CONTROL MODULE (TWO-STEP DEPLOYMENT CONTROL SYSTEM)].)
Seat belt Without Lap Pre-tensioner Seat Belt
1. Switch the ignition off.
2. Disconnect the negative battery cable and wait for 1 min or more. (See NEGATIVE BATTERY CABLE DISCONNECTION/CONNECTION.)
3. Pass the seat belt through the slit of the guide, move it in the order of arrows (1) and (2) shown in the figure, and remove it from the guide.

4. Remove the following parts:a. Scuff plate (See SCUFF PLATE REMOVAL/INSTALLATION.)b. Front seat back bar garnish (See SEAT BACK BAR GARNISH REMOVAL/INSTALLATION.)c. Quarter trim (See QUARTER TRIM REMOVAL/INSTALLATION.)d. Tire house trim (See TIRE HOUSE TRIM REMOVAL/INSTALLATION.)
5. Bend back the back trim. (See BACK TRIM REMOVAL/INSTALLATION.)
6. Using a flathead screwdriver, lift the pre-tensioner seat belt connector locking device carefully, however do not remove it.

7. Disconnect the pre-tensioner seat belt connector.
8. Remove bolt A.
9. Remove bolt B.
10. Remove the seat belt retractor.
11. Remove the seat belt.
12. Install in the reverse order of removal.
13. Switch the ignition ON (engine off or on).
14. Verify that the air bag/seat belt pre-tensioner system warning light illuminates for approx. 6 s and turns off.< Previous Next >
If the air bag/seat belt pre-tensioner system warning light does not operate, refer to the on-board diagnostic system (air bag system) and perform inspection of the system. (See FLOWCHART [SAS CONTROL MODULE (STANDARD DEPLOYMENT CONTROL SYSTEM)].)