MX5 mk4 Manual
Home bodyshop manual wiring diagram workshop manual service highlights transmission overhaul

Knowledge Base

Free to use workshop manual for your 2015+ Mk4 'ND' Mazda MX-5
Home


< Previous   Next >

DETERMINING SHORT TO POWER SUPPLY LOCATION (MS-CAN)

CAUTION:

  • Perform the following malfunction diagnosis only when it is diagnosed with a short to the power supply by CONTROLLER AREA NETWORK (CAN) MALFUNCTION DIAGNOSIS FLOW. (See CONTROLLER AREA NETWORK (CAN) MALFUNCTION DIAGNOSIS FLOW.)

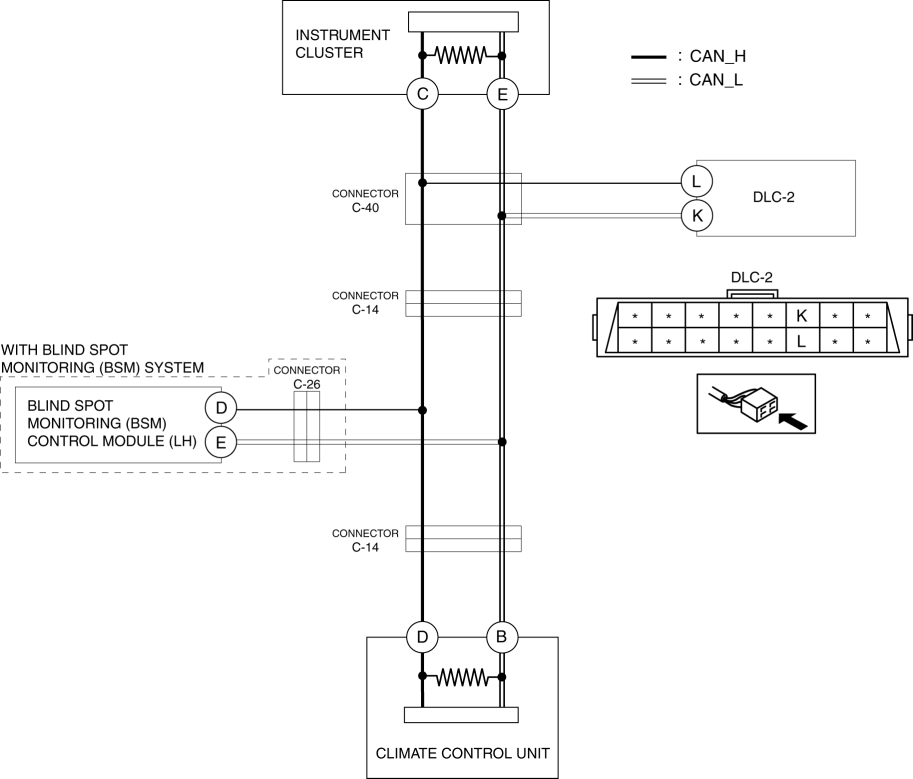
System Wiring Diagram

Determination procedure

CAUTION:

  • When disconnecting the connector, verify that there is no looseness, damage, deformation, corrosion, or poor connection of the connector terminals.

  • When inspecting the DLC-2, touch it with a paper clip or similar thin pin without directly inserting a tester into the terminals.

  • Disconnect the negative battery cable before performing any work that requires handling of connectors.

Step

Inspection

Action

1

INSPECT FOR SHORT TO POWER SUPPLY BETWEEN CONNECTOR C-40 AND INSTRUMENT CLUSTER
  • Switch the ignition off.

  • Disconnect the negative battery cable.

    (See NEGATIVE BATTERY CABLE DISCONNECTION/CONNECTION.)

  • Disconnect the connector C-40.

  • Connect the negative battery cable.

    (See NEGATIVE BATTERY CABLE DISCONNECTION/CONNECTION.)

  • Switch the ignition ON (engine off).

  • Measure the voltage at instrument cluster terminals C and E.

  • Is the voltage between 1.5—3.5 V?

Yes

Go to Step 3.

No

Go to the next step.

2

INSPECT INSTRUMENT CLUSTER FOR SHORT TO POWER SUPPLY
  • Switch the ignition off.

  • Disconnect the negative battery cable.

    (See NEGATIVE BATTERY CABLE DISCONNECTION/CONNECTION.)

  • Disconnect the instrument cluster connector.

  • Connect the connector C-40.

  • Connect the negative battery cable.

    (See NEGATIVE BATTERY CABLE DISCONNECTION/CONNECTION.)

  • Switch the ignition ON (engine off).

  • Measure the voltage at DLC-2 terminals L and K.

  • Is the voltage between 1.5—3.5 V?

Yes

Replace the instrument cluster because there is a short to the power supply in the instrument cluster.

(See INSTRUMENT CLUSTER REMOVAL/INSTALLATION.)

No

Repair or replace the wiring harness between the instrument cluster and connector C-40 because the wiring harness is shorted to the power supply.

3

INSPECT FOR SHORT TO POWER SUPPLY BETWEEN CONNECTORS C-40 AND DLC-2
  • Measure the voltage at DLC-2 terminals L and K.

  • Is the voltage 0 V?

Yes

Go to the next step.

No

Repair or replace the wiring harness between DLC-2 and connector C-40 because the wiring harness is shorted to the power supply.

4

INSPECT FOR SHORT TO POWER SUPPLY BETWEEN CONNECTOR C-40 AND CONNECTOR C-14
  • Switch the ignition off.

  • Disconnect the negative battery cable.

    (See NEGATIVE BATTERY CABLE DISCONNECTION/CONNECTION.)

  • Disconnect the connector C-14.

  • Connect the connector C-40.

  • Connect the negative battery cable.

    (See NEGATIVE BATTERY CABLE DISCONNECTION/CONNECTION.)

  • Switch the ignition ON (engine off).

  • Measure the voltage at DLC-2 terminals L and K.

  • Is the voltage between 1.5—3.5 V?

Yes

Go to the next step.

No

Repair or replace the wiring harness between connector C-40 and connector C-14 because the wiring harness is shorted to the power supply.

5

INSPECT FOR SHORT TO POWER SUPPLY BETWEEN CONNECTOR C-14 AND CLIMATE CONTROL UNIT
  • Measure the voltage at climate control unit terminals D and B.

  • Is the voltage between 1.5—3.5 V?

Yes

Go to the next step.

No

Go to Step 8.

6

INSPECT FOR SHORT TO POWER SUPPLY BETWEEN BLIND SPOT MONITORING (BSM) CONTROL MODULE (LH) AND CONNECTOR C-26
  • Switch the ignition off.

  • Disconnect the negative battery cable.

    (See NEGATIVE BATTERY CABLE DISCONNECTION/CONNECTION.)

  • Disconnect the connector C-26.

  • Connect the negative battery cable.

    (See NEGATIVE BATTERY CABLE DISCONNECTION/CONNECTION.)

  • Switch the ignition ON (engine off).

  • Measure the voltage at blind spot monitoring (BSM) control module (LH) terminals D and E.

  • Is the voltage between 1.5—3.5 V?

Yes

Repair or replace the wiring harness between the connector C-14 and connector C-26 because the wiring harness is shorted to the power supply.

No

Go to the next step.

7

INSPECT BLIND SPOT MONITORING (BSM) CONTROL MODULE (LH) FOR SHORT TO POWER SUPPLY
  • Switch the ignition off.

  • Disconnect the negative battery cable.

    (See NEGATIVE BATTERY CABLE DISCONNECTION/CONNECTION.)

  • Disconnect the blind spot monitoring (BSM) control module (LH) connector.

  • Connect the connector C-26.

  • Connect the connector C-14.

  • Connect the negative battery cable.

    (See NEGATIVE BATTERY CABLE DISCONNECTION/CONNECTION.)

  • Switch the ignition ON (engine off).

  • Measure the voltage at DLC-2 terminals L and K.

  • Is the voltage between 1.5—3.5 V?

Yes

Replace the blind spot monitoring (BSM) control module (LH) because there is a short to power supply in the blind spot monitoring (BSM) control module (LH).

(See BLIND SPOT MONITORING (BSM) CONTROL MODULE REMOVAL/INSTALLATION.)

No

Repair or replace the wiring harness between the blind spot monitoring (BSM) control module (LH) and connector C-26 because the wiring harness is shorted to the power supply.

8

INSPECT CLIMATE CONTROL UNIT FOR SHORT TO POWER SUPPLY
  • Switch the ignition off.

  • Disconnect the negative battery cable.

    (See NEGATIVE BATTERY CABLE DISCONNECTION/CONNECTION.)

  • Disconnect the climate control unit connector.

  • Connect the connector C-14.

  • Connect the negative battery cable.

    (See NEGATIVE BATTERY CABLE DISCONNECTION/CONNECTION.)

  • Switch the ignition ON (engine off).

  • Measure the voltage at DLC-2 terminals L and K.

  • Is the voltage between 1.5—3.5 V?

Yes

Replace the climate control unit because there is a short to the power supply in the climate control unit.

(See CLIMATE CONTROL UNIT REMOVAL/INSTALLATION [FULL-AUTO AIR CONDITIONER].)

(See CLIMATE CONTROL UNIT REMOVAL/INSTALLATION [MANUAL AIR CONDITIONER].)

No

Repair or replace the wiring harness between the climate control unit and connector C-14 because the wiring harness is shorted to the power supply.

< Previous   Next >
 

Free to use workshop manual for your 2015+ Mk4 'ND' Mazda MX-5

COPYRIGHT NOTICE:
This fan site is not affiliated with Mazda, and is intended for personal, or commercial use only. The content of our web pages is for general information purposes only and is presented “as is”. We give no assurance or warranty regarding the accuracy of the contents. Readers should do their due diligence and seek the advice of an appropriately certified automotive technician before attempting any steps on this site. Original content provided by Mazda North America. The content of the manual is copyright under DMCA to: full.metal.resistor@gmail.com
LIMITATION OF LIABILITY:
We accept no responsibility for errors, inaccuracies, or omissions found on these pages. Additionally, we hereby exclude liability for any demands, claims, damages or losses of any kind with regard to any content or information provided on our web-site, including but not limited to incidental or consequential damages, direct or indirect loss, compensatory damages, loss of profits, or otherwise. By using this manual you assume full liablity for any procedures carried out on your vehicle, and are responsible for the vehicle remaining road legal and safe.
Site design © MX5 Docs 2019
Privacy policy
Cookies
X
We use cookies to improve your experience on
our site. By using our site you consent to cookies.
Learn more
I Agree