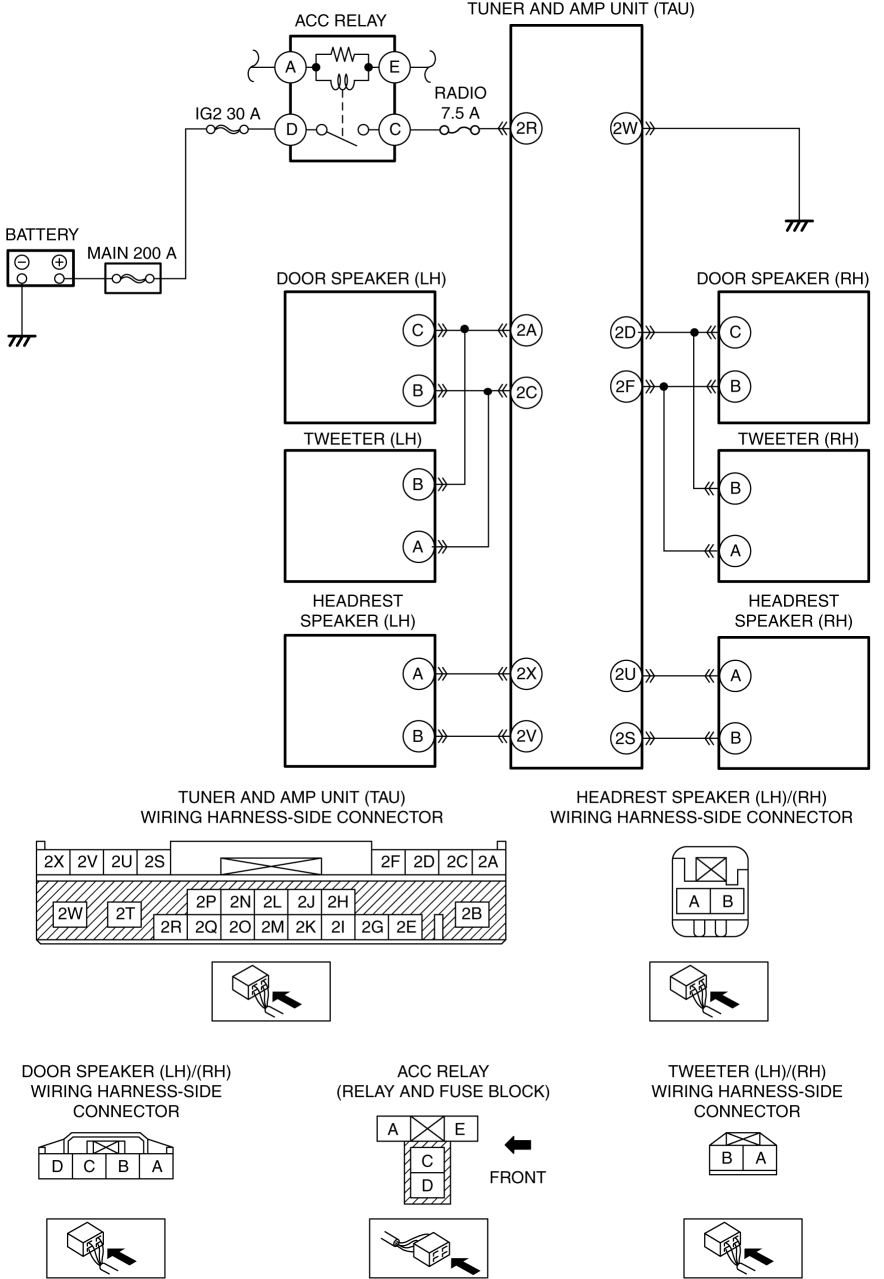
NO SOUND OUTPUT IN ALL MODES [ENTERTAINMENT SYSTEM [WITH CENTER DISPLAY]]
Without Bose®
| Description |
NO SOUND OUTPUT IN ALL MODES |
| Sound is not output from speakers even if any mode is selected |
|
| Possible Causes |
|
| System Wiring Diagram |
|
| Step |
Inspection |
Action |
|
| 1 |
|
Yes |
|
| No |
|
||
| 2 |
|
Yes |
Go to the next step. |
| No |
Repair or replace the connector, then go to Step 10. |
||
| 3 |
|
Yes |
Go to the next step. |
| No |
Repair or replace the connector, then go to Step 10. |
||
| 4 |
|
Yes |
Go to the next step. |
| No |
Inspect the MAIN 200A fuse, IG2 30A fuse and RADIO 7.5A fuse.
Go to Step 10. |
||
| 5 |
|
Yes |
Go to the next step. |
| No |
|
||
| 6 |
|
Yes |
Troubleshooting completed (explain the contents of the servicing to the customer). |
| No |
Replace the CMU, then go to Step 10. |
||
| 7 |
|
Yes |
Go to the next step. |
| No |
Replace the malfunctioning speaker, then go to Step 10. (See DOOR SPEAKER REMOVAL/INSTALLATION.) (See TWEETER REMOVAL/INSTALLATION.) |
||
| 8 |
|
Yes |
Go to the next step. |
| No |
|
||
| 9 |
|
Yes |
|
| No |
Go to the next step. |
||
| 10 |
|
Yes |
Troubleshooting completed (explain the contents of the servicing to the customer). |
| No |
Verify the malfunction symptom in the symptom troubleshooting chart and perform the other applicable malfunction diagnosis. (See SYMPTOM TROUBLESHOOTING [ENTERTAINMENT SYSTEM [WITH CENTER DISPLAY]].) |
||
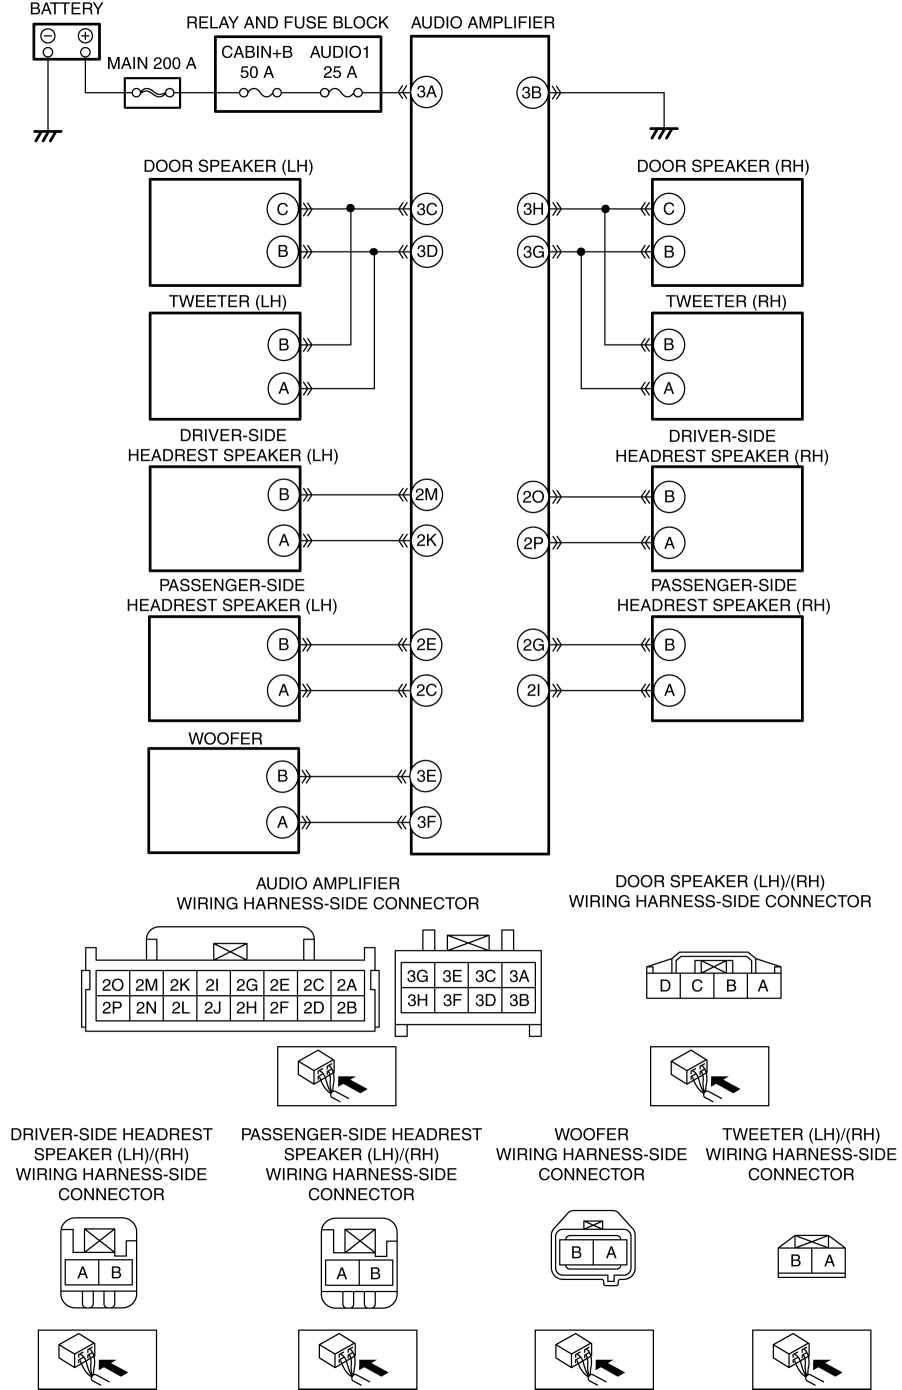
With Bose®
| Description |
NO SOUND OUTPUT IN ALL MODES |
| Sound is not output from speakers even if any mode is selected |
|
| Possible Causes |
|
| System Wiring Diagram |
|
| Step |
Inspection |
Action |
|
| 1 |
|
Yes |
|
| No |
|
||
| 2 |
|
Yes |
Go to the next step. |
| No |
Repair or replace the connector, then go to Step 10. |
||
| 3 |
|
Yes |
Go to the next step. |
| No |
Repair or replace the connector, then go to Step 10. |
||
| 4 |
|
Yes |
Go to the next step. |
| No |
Inspect the MAIN 200A fuse and CABIN+B 50A fuse and AUDIO1 25A fuse.
Go to Step 10. |
||
| 5 |
|
Yes |
Go to the next step. |
| No |
|
||
| 6 |
|
Yes |
Troubleshooting completed (explain the contents of the servicing to the customer). |
| No |
Replace the CMU, then go to Step 10. |
||
| 7 |
|
Yes |
Go to the next step. |
| No |
Replace the malfunctioning speaker, then go to Step 10. (See DOOR SPEAKER REMOVAL/INSTALLATION.) (See TWEETER REMOVAL/INSTALLATION.) (See WOOFER REMOVAL/INSTALLATION.) |
||
| 8 |
|
Yes |
Go to the next step. |
| No |
|
||
| 9 |
|
Yes |
|
| No |
Go to the next step. |
||
| 10 |
|
Yes |
Troubleshooting completed (explain the contents of the servicing to the customer). |
| No |
Verify the malfunction symptom in the symptom troubleshooting chart and perform the other applicable malfunction diagnosis. (See SYMPTOM TROUBLESHOOTING [ENTERTAINMENT SYSTEM [WITH CENTER DISPLAY]].) |
||